Adventures in melted chocolate: Letters and Cups
To make a chocolate message with individual letters:
- Write or print the message on a sheet of paper.
If using a printed message, use a simple font, and set the attributes to "bold" and "outline". If you wish to center the message on a cake, center it on the page, too. This will prevent having to calculate how to line things up on the cake later.
Using a printed image helps make the font and spelling consistent.
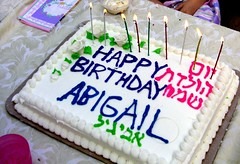
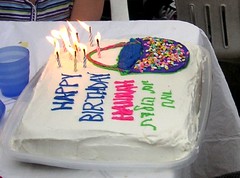
If you choose not to use an "outline" font, then try to print the message with a color that is very different than chocolate! (For my Hebrew lettering of "Chag Sameach" ("Happy Holiday") shown below, I used pink. Black letters are hard to distinguish from the chocolate, and often result in unwanted holes in the letters.)

- Place the paper on a cookie sheet, and cut a sheet of waxed paper to fit over it. Tape the waxed paper in place.
Alternatively, a piece of strong cardboard or foam core board can be used instead of the cookie sheet. This template will be reusable, so the cardboard-message-waxed paper kit can be saved for later re-use. This works well with common message ("Happy Birthday!") that will see frequent enough use to justify storing the board. - Melt a package of chocolate chips in a microwave safe bowl, by heating at half power for a minute or two. Stir them until the chocolate is smooth and pourable.
- Place a strong plastic bag or (preferred) a disposable piping bag inside a drinking glass. Fold the top of the bag over the outside of the glass. This will hold the bag open to receive the melted chocolate.

- Fill the bag less than 2/3 full.
- Twist the top third of the bag to keep the chocolate from oozing out from the top.
- Snip of the smallest bit of the corner of the plastic bag that allows for a smooth flow of chocolate.

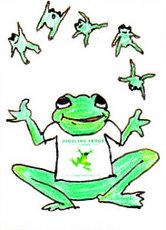
- Use a firm and constant pressure to outline a few of the letters of the message in chocolate. By the time a few of the letter outlines are done, the thin lines of chocolate will have hardened, giving structure to the letter that will prevent the
chocolate from flowing outside the outline.
Go back and fill in the letter middles when the outlines are hardened.
- If you make a mistake, the chocolate can be fixed with a toothpick while it is still melted.
Resist the urge to use your finger! There will be plenty of chocolate in the bowl to nosh on later.
If you forget and use your finger, you'll have to wash your hands before continuing. If you do that, be sure to dry them very well before resuming any chocolate-related activities. The tiniest bit of water will dull the chocolate.
Don't touch the chocolate with wet hands.
- The letters take very little chocolate. It pays to have a few other board-pages set up, to make a few chocolate messages for later.
The chocolate will keep well in a sealed container, kept cool, (room temperature) dry place.


Some advantages to this method:
- Chocolate messages are nice for those who don't like the uncertainty of writing in frosting.
- The letters can be placed on other desserts, such as fruit, ice cream, or sorbet.
- It is much easier to find pareve chocolate chips than pareve frosting.
- These can be made with high-quality chocolate.
- Chocolate tastes better than frosting.
- Since the message is written first, it will fit on the cake!
- Mistakes can be melted again for another turn.
- These letters are made in advance, away from the cake.
- They can be put on a store-bought frosted cake. It is easy to transport the chocolate message to another town, buy a cake last-minute at a bakery or supermarket, and add the message later.
- The letters can be removed from the cake, allowing the message to be saved. (Like having your cake and keeping the message part, too!)
- This is workable solution for when the bakery is unlikely to be able to write in Hebrew.
- Since the only food-equipment needed (other than the disposables) is a microwave safe container and a bag of chocolate chips, these can be made on-site at a school's kitchen, in cases where home-baking is not allowed. (Or in a non-kosher kitchen, CYLOR)
To make chocolate dessert cups:
Melt chocolate in a microwave safe bowl at half power for a couple of minutes. If making chocolate message also, do the message part first, and make the cups afterwards.
The letters use very little chocolate. One 12 oz. bag of chocolate chips makes (approximately) 24 mini-cups.
Any cupcake pan will work, but the new silicone pans release the chocolate beautifully. They can be stretched and pulled without breaking the chocolate.
When I used to do this with regular mini-cupcake tins, I assumed I'd have 25% breakage. (Broken cups can be re-melted for a second chance.)
With the silicone pans, I have about 1% breakage!


I let the girls make these with the silicone pans. I wouldn't with the metal pans, because it's too frustrating for them, wasteful (of time and chocolate), and annoying for me to keep saying, "NO! You can't eat all of the broken ones!"
Smear the chocolate inside the cupcake molds, making sure to cover the whole inside of the mold, and allowing for a fully coated, but not too thick layer on the bottom of each cup.
(If you made a message first, you can just use the pastry bag to squirt the chocolate in each cupcake cup. This makes this whole project very clean, fast, and easy.)
Take a rubber spatula and smooth the edges of the mold, removing the inevitable bits of chocolate that have dribbled past the sides of the cupcake cups.
Silicone molds are flexible, and need to be supported by a cookie sheet.
Refrigerate the chocolate for half an hour, or allow to cool at room temperature for a couple of hours.


When the chocolate hardens, gently pop the finished cups from their molds. Do this onto the cookie sheet, as there will be lots of little chocolate shavings on the counter. These shavings can be re-melted.

Mazal Tov!
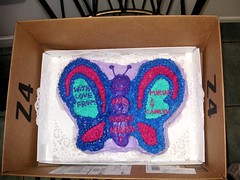
My husband isn't a great cake fan, and we still have half of his birthday cake in the freezer from last week. So, for our anniversary, I went for the straight ice cream and dark chocolate alternative...

The word "anniversary" was too long to fit on one of my regular serving platters, so I made a disposable cake platter from a shipping box, covered with a recycled scrap of wrapping paper.
Since the ice cream might melt a bit, I "laminated" the top with packing tape, to make it water- (and ice cream-) resistant.

The chocolate letters rest on small scoops of his favorite flavor of ice cream, held by the little chocolate cups.
This project used less than one bag of chocolate chips and less than a pint of ice
cream. (Thus, the whole message cost about $2 to make, platter included.)
The chocolate cups and the letters survive the freezer nicely, so it is easy to make this in advance. Cover the frozen message if it is going to stay in the freezer (especially a frost-free freezer) for more than an hour or two.

By the way, my husband and I were married twenty years ago today! Mazal Tov!
Related posts:


7 comments, so far. Add yours now!
Post a Comment
Mazal Tov.
Happy Anniversary!
Great tips. Do you peel the letters off the wax paper and then put them in the refrigerator?
Thank you, SephardiLady and Diana!
Anonymous,
Thanks! If your kitchen is hot, or if you're in a hurry, the letters can be solidified by chilling them in the refrigerator.
The chocolate for the letters is thin, so setting the tray aside at room temperature is usually sufficient to harden them.
They peel off very easily.
Then, once they're made and separate from the waxed paper, they just need a cool, dry place to store. They don't need to be refrigerated.
The letters are just a bit more delicate than the chocolate chips from which they were born.
I keep them in a zipper plastic bag.
For the cups, which take up more space, are more delicate, and are produced in larger quantities, I use an empty (#6 type plastic) clam-shell container (mine held spinach before its reincarnation).
I stack the cups between layers of folded aluminum foil. These containers stay at room temperature, in a kitchen cabinet, protected from moisture and children. (But, alas, not from me!)
Mazal Tov! And I COMPLETELY look forward to each and every installment - you are BRILLIANT! The "Frum-Frugal Martha Stewart" - and that's a HIGH compliment. :)
Another wonderful idea. You're the best (and making me look pretty darn good with all the new ideas you are giving me!)
Mazel Tov.
thanks for your blog. your instructions were so helpful. my lettering came out so well.
Post a Comment