Wednesday, October 31, 2007

Make your own cookie cutter from clip-art and a foil pan


I wanted to make camel-shaped cookies this week, but couldn't find a camel-shaped cookie cutter in time. So I made my own.

If you're making a small batch of cookies, it is faster and easier to make a tape-covered/laminated template, and trace it with a knife. For larger batches, however, this method is very satisfying and worth the effort.


On Monday, while waiting to use the school's photocopy machine, I noticed one of my daughter's teachers making copies of a simple camel graphic. It was meant to be! She gave me a couple of copies of it so I could make a camel cookie cutter.


To measure the length of the outline's perimeter, I took a few pipe cleaners/chenille stems and outlined the shape.


After completing the shape in pipe cleaners, I straightened them to get the measurements.

My camel needed 31" of cutter material.


I used the bottom of a pair of half-size steam table pans for the template, and the sides as the cutter edge. .

It's best to have at least one spare pan, to avoid the stress of limited materials. I get these pans in bulk from either the restaurant supply store or Costco. They cost about 30 cents each. I used two pans, a few staples, a pair of printouts and glue from the glue gun.

This method resulted in a custom, detailed 5.5" x 4.5" cookie cutter for under $1. It's not a copper heirloom, but it held up well and I've saved it for future reuse.


To make the template, trim the printout, leaving a border of about 1" around the shape. Fold the bottom of the foil pan in half, and staple it to the rough-cut shape in multiple places, well inside the border of the desired shape.


Trim away the rounded corners of the sides and discard them. The flat parts become the cutting edges of the cookie cutter. Cut enough to have about 10% more than the perimeter needs. (I needed 31", so I cut about 3 feet of edges.)


For each edge section, fold the top half twice to make a handle. Be careful, the foil can be sharp.


Using the roughly outlined stapled printout, cut through the two layers of foil and the printout together, (three layers total). Make this as accurate as possible.


When done with this step, you'll have a template that is paper on the top, and two layers of foil on the bottom. I'm going to call this the First Foil Sandwich. This is the view of the bottom:


This is the top:

Make the Second Foil Sandwich. Fold the second foil pan's bottom and staple the First Foil Sandwich to the folded foil bottom. Staple inside the shape's outline through all the layers, keeping the staples well inside the shape.


Cover the paper part of the Second Foil Sandwich with packing tape to protect it from the cookie dough, and to allow it to be washed.


Cut through the bottom/new two layers of foil to create the completed template. It will be five layers thick: One "laminated" paper layer, and four foil layers.

Use a glue gun and a stapler to secure all the edges together. It should be firm and solid.


Holding the prepared sides carefully by their folded edges, bend them around the template. The foil will be shaped a bit differently on the top folded edge than the bottom sharp edge. Concentrate on getting the bottom edge to follow the template accurately at the expense of the folded edge's shape. The part that cuts is what really matters.


When it's time to join two sections of foil, line up the cutting edges and overlap the side pieces with a glue gun. I like to have at least an inch of overlap.

If the tops don't align, don't worry. It is critical that the bottom cutting edges are aligned, but the tops can be folded to meet.


When the last piece is bent, leave it unattached. Do not complete the loop.

Once the shape is complete, insert the template in the bent cutter. Using a glue gun, attach the inside edge of the cutter to the outside edge of the template, about 1" or less from the cutting edge.

The template will help keep the shape accurate, and give it strength to last through multiple uses without distorting its shape.

When the entire perimeter of the template is glued to the inside of the cutter shape, you will be left with the overlap of the incomplete circuit/loop of cutter edge. These can now be secured together with the glue gun.


Make your favorite recipe for rolled cookies. We made sugar cookies and gingerbread cookies.


Most rolled doughs require some chilling. If you have a large shape, a pair of long, flat spatulas are helpful.


Most cookies do well with parchment paper. I use my metal kitchen chairs as cooling racks.


I didn't get to the gingerbread cookies in time to frost them, because the kids came home and "tested" half of them, then put the rest away for their lunchboxes.

Gingerbread tends to spread, so some of the details of the cookies' shapes are lost. This can be an advantage, if the shape has defects. The sugar cookies have a more controlled rise, retaining all the shape's contours and details.


Here is one of the lunchbox-ready gingerbread cookies. If it were any bigger, it would be a tight fit for a sandwich bag.


This is the cookie cutter, after it made about 90 cookies and was washed well with warm water and soap.

And this is the same cookie cutter, seen from the bottom.


Putting the Parsha on the Menu: Chayei Sarah

This week's Torah Portion is parshat Chayei Sarah, in which Sarah dies, and Abraham purchases the Machpela (cave of couples) as a burial place for her. Then we are told the story of how Rivka (Rebbecca) was selected as a wife for Yitzchak (Isaac), and of their first meeting.

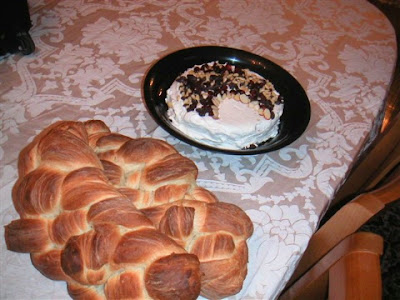
Here's this year's (very quick and easy) parshat Chayei Sarah Machpela cake:


Here's a healthier version from a previous year, made with dried fruit and nuts:


I just noticed this year that the "courtship" of Rivka and Yitzchak comes bounded by camels at both ends. We were introduced to Rivka with camels (when she offers to water all of Eliezer's camels, thus showing herself worthy of marrying Yitzchak), and she drops off her camel when she is sees Yitzchak for the first time.

So, we made camel cookies:


I made sugar cookies and gingerbread. I wasn't able to frost the gingerbread cookies, because they disappeared into the kids' lunches before I had the chance to put them away and save them for Shabbat.


I didn't have a camel cookie cutter, so I made one. See the next post for instructions for making your own cookie cutters.

I'm also working on a well (because the episode with Rivka takes place at a well), but will only post more info if it works. There are two versions, one with chocolate and graham crackers, and another (healthier) version with matzah and vegetables, using hummus as spackle to hold cucumber discs to the matzah roof.

(The graham cracker version would make a great classroom snack-time activity. Just melt some chocolate chips, give each kid 3-4 graham crackers, and empty out the snack drawer of any pretzles, cookies, etc. and let them design their own wells.


Update (Friday afternoon): Both wells worked. They both can be seen in this picture. Here's a close up of the one made of vegetables:
The matzot are held together with melted chocolate. Inside the well are carrots, inserted in a heavy-bottomed glass. The cucumber slices are spackled to the roof of the well with hummus. The yellow pepper bucket holds more hummus to serve.
Shabbat shalom!

Monday, October 29, 2007

They did it!


There is no such thing as The Curse. Or if there was such a thing, it is really and truly over.

I get my dining room table back

The kids can go to bed at a reasonable hour this week.

All is right with the world.

Friday, October 26, 2007

Shabbat Shalom! שבת שלום

Please note: this blog is not updated on Friday nights or Saturdays. Comments made during this time will be put in a queue, to be moderated after Shabbat.


Shabbat Shalom!


I have enjoyed a few recently published articles about parshat Vayera:

Quick Rolodex-compatible file

I needed another Rolodex-compatible file, but didn't want to pay for a real one. So I made one from a box-bottom and a pair of chopsticks.


Not only was it free, but it took all of five minutes to make (mostly because I took pictures), and it weighs less than the black plastic kind.


I used a box that was just a bit shorter than the chopsticks, but wider than the cards.


To line up the chopstick guides, I outlined a card on either end in pencil. Since each chopstick was going to thread through only two holes, it wasn't critical that the card on the front of the box and the card on the back of the box align exactly.

The important measurement is the distance between the holes.


A corkscrew's point was perfect for starting the holes. Don't make them too wide, because tighter holes will hold the chopstick more securely.


Push the narrow end of the chopstick through the outside back, and then the inside of the front.

I left mine as is, but if I were planning on heavy use, I'd attach a couple of wooden dowel caps to the four tips with glue-gun glue, to secure. (In the picture below, I'm demonstrating this with a couple I had on hand that had faces drawn on them. I didn't do this to mine.)


It works well. I'm really pleased with it.


See also:

Proud Member of RankSlam 2007

Google's page ranking system seems to be broken, causing consternation for bloggers and readers.


I admire the spin Darren Rowse and Brian Clark have on this situation. They're making a contest of designing a "badge" for those affected.

What a great way to turn aggravation into opportunity!

Thursday, October 25, 2007

I feel the need to apologize to the World...

...because last night's uninteresting first World Series game is my fault. I've been praying for a four-game sweep because I want my dining room table back.

Have I mentioned there is a television on my dining room table?

If you ever spent time in Boston, you'll understand how one can be a Red Sox fan absent any interest in baseball.

Wednesday, October 24, 2007

Costume making tips

(In response to a couple of e-mail queries about costumes, here's a reprint of something I posted originally to the B*rn Org*n*zed group in 2002. It has subsequently been forwarded by others to the JewishHomemaking and JewishFlyBabies groups over the years.)

Although Jews don't have to worry about children's costumes until the Winter (for Purim), many others are coming up on an October line for Halloween costumes, so I thought a tip or two might be appropriate.

Before I wised up, I would spend a lot of time, thought and energy making what I thought was the most appropriate (for us the costumes are for a religious holiday and I prefer Queen Esther to Ninja Turtles or Power Rangers) adorable, comfortable, and safe-to-walk costume that made the child feel truly special.

Now that I've lowered my standards, we are all much happier, relaxed and satisfied.

I only demand that the costume is safe, comfortable and not offensive. I try hard (but not over-hard) to please the child, and accept that the cute, adorable part is the child inside the costume.

I've come to the realization that if the child is happy with what he is wearing then my ideas of what a "real" costume are, are irrelevant.

With this in mind, I ask the children what they want to be [for Purim]. If I hear something I don't like, I tell them to try again. (I still have a great aversion for licensed characters, but will cave in and accept Batman, Superman, etc. as they have been around for a long time. Barbie, Batman Beyond, etc. have been successfully vetoed over the years.

I still lobby for Mordechai and Queen Esther, but have accepted a foursome of Batpeople - Batman, Batlady, Batkid and Batbaby - X-man (see below), a pirate, a bat (the winged mammal), many lions, tigers, bunnies (including an Energizer Bunny baby - with batteries made from paper towel cardboard tubes), sunflowers, strawberries, etc.)

My most important realization was that the child should be in charge. When my son wanted X-Man, I grumbled, but agreed. Then I asked him what I think is the KEY question: "What would you need to really be X-Man? Let's make a list."

He immediately gave me HIS IDEA of what he needed to feel like that character. He listed a few basic things, most of which HE WANTED TO MAKE!!!! He only wanted "ears, a mask and a black sweatsuit" from me. He made claws, accessories, emblems, etc. out of paper.

When he was finished, he looked like a happy kid in a sweatsuit and a mask, with some
things stuck all over him. He couldn't audition for a job with Steven Spielberg,
but he could walk, see and breathe comfortably and was thoroughly convinced
of his believability as X-man. (Whatever that is.)

Asking this question of him obviated the need (okay, desire) for me to search the Internet and find out exactly what X-Man was, prevented me from wasting myself trying to create an 's image of what that costume looked like, and saved me being annoyed if he was disappointed with my efforts.

It also completely eliminated the possibility that he would change his mind the
day or two before the costume was needed. It was a joint effort, but mostly
HIS.

My daughters were too young to make any part of their costumes, but they still gave me the list. This helped enormously. One wanted to be a bat (the winged mammal). I asked her what she needed to be a bat. She knew exactly what SHE NEEDED to feel like a bat, and was (for the first time) quite pleased with the costume.

About making the costumes, here are some tips that we have used successfully:

"Get thee to a thrift store!" We found a complete tiger costume for 75 cents, and many "accessories" there. I have also read of people buying a huge stuffed animal at a thrift store, cutting it open, emptying the stuffing and using the fabric cover (after it has been washed) as a whole-body costume.

We often use sweat suits as the base of any costume. After the holiday, they can be retained as pajamas.

If you have children and don't have a glue-gun, rectify this situation immediately! Glue guns cost less than $5, the glue sticks can often be found for 3 cents a piece, and this tool can be used for so many things. We have a "low temp" which gets hot but is unlikely to cause a major
burn.

In a pinch, you can glue fabric pieces together in the same fashion as if they were to be sewed (this is a costume, not a permanent garment, after all).

Gluing yarn, goggle eyes, felt, etc. to sweatshirts is SO EASY and accomplishes a "real" look in an instant. Glue gun glue cools and dries in about a minute.

Check to see that the costume can accommodate a coat or sweater easily. If appropriate, make sure that a diaper change is possible.

Costumes for crawling babies should assume that they will want to crawl. Consider making them some sort of four-legged animal. We have had great luck with this, as the "bulk" of the costume-y parts are therefore on the baby's back where they cannot be reached and swallowed.

I hope to post more costume ideas when it gets closer to Purim (mid-Winter), the Jewish holiday that involves costume making. And here is a fantastic modular approach to costume making over at ParentHacks.

Tuesday, October 23, 2007

3x5 Rolodex-compatible folder

Here's a way to make a 3"x5" Rolodex compatible folder to hold related cards together. The cards can be removed, relocated, and replaced together.

The folder is made from a single 8"x5" index card. In this example, I used a blank blue one.


Hold a 5"x8" index card in portrait orientation and a 3"x5" Rolodex card in landscape orientation.

Line up the two top edges.


Fold the large card BACKWARDS from the bottom of the smaller card.

The back will be longer than the front.

Using the hole punch set up for making Rolodex-compatible cards from 3x5 index cards, punch the folder as though it were a regular card, on the side that has the folded edge.

Use a scissors to cut from the folded edge to the punched holes.


Trim the back of the card to the same height as the front, with a bulge for an index tab.


This is what it looks like when held open:

Write a label on the index tab. Individual related cards go inside the folder. They can be removed, relocated, and reinserted together as a unit.


See also:

If you liked this article, congratulations! You have great taste. Please brew yourself a cup of coffee.
subscribe to Juggling Frogs