FrankenDresses: How to make play dresses from recycled t-shirts using only one seam
(Warning: Experienced and proper garment sewers should avert their eyes. I'm about to break a bunch of sewing rules. Malky D. and Miriam S., this means you.)
Now that Summer Vacation is almost over, I have been decluttering the children's closets to make sure they have clothes that fit them for school, the holidays, and the colder weather. A by-product of this activity is a huge pile of clothes are too stained, or beyond repair, and thus can't be used, given away, or donated to charity.
Meanwhile, we struggle with the fashion challenge of finding modest and rugged play dresses for the girls. We are constantly on the lookout for long-sleeved play dresses. We are weary warriors on the belly-shirt battlefront.
Did I mention that my sewing machine and serger are both broken? (I did finally take them out of the mini-van's trunk. Unfortunately, I did so without having had them fixed.)
FrankenDresses are my solution to all of these problems.
The materials are free, the whole project can be accomplished with no ironing or pressing, minimal measuring, and (since I'm stuck sewing by hand) there is only one quick seam to sew.
Other than the overnight drying time, this project takes about half an hour to complete
This method can be used to make inexpensive matching dresses for school performances or teams, and to make costumes.
- From the Pile of Dead Clothing, take one stained-but-fits shirt and one that is too big for the child. (The too big can come from an older sibling, parent, or from the never-ending collection of shirts from school and from tie-die or t-shirt decorating parties.)
The dresses in this example are made for Gretta, who is three years old and wears a size 3T. The turtleneck we used is in fine condition, but it has stains on it, and it is a belly-shirt when she raises her arms. The neck and sleeves fit her, though.
The t-shirt belonged to an older sister and has been used as a "painting shirt" a few too many times.
- Use a dress that fits the child well as a guideline for the length of the dress.

- Arrange the larger shirt under the top shirt, such that it is about one inch longer than the guideline dress. This will give room for the fold and the seam allowance.

- Mark and cut the skirt from the t-shirt. I used a rotary cutter (because I have one) but scissors are fine to use.
 (If
(If
my sewing machine and/or serger were working, or if I could find my pinking shears, it would be better practice to finish the inside edge of the skirt, where in was cut.)
The truly frugal will lob off the sleeves of the shirt to make a disposable baby bib from the remainder. - Insert a piece of cardboard between the layers of the skirt and decorate it.
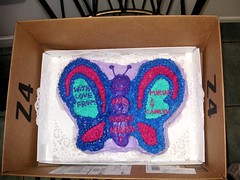
As a stencil, I used those foam shapes that come home on the kids' projects from school and at birthdays They are available at craft stores, but could easily just cut shapes from anything thick and waterproof. I attached these in quasi-random places with a glue stick.
Don't put the stencil all the way on the edges of the skirt. Leave a little room so the skirt can be rotated a bit, allowing the edges to be matched for color.
- Use fabric paint color that is compatible with the color of the top shirt.

- Sponge the paint gently over the whole surface. Be careful not to make the fabric paint too thick because it will be difficult to push the sewing needle through the dried paint.
 Alternatively, color fabric paint spray can be used. It's makes for an easy, quick and softer (because it uses less paint) skirt, but it is expensive. (About $3.50 a bottle, vs. the $1/bottle sale-price regular stuff.)
I compromised and used a combination of the two because (a) I'm too cheap to only use the more expensive product, (b) I wanted to finish the bottle of fabric paint that was not enough to save, (c) that bottle wasn't enough to cover the whole skirt, and (d) using more than one color of paint helped cover up the little splotches that typically form where the spray-nozzled droplets build up.
- When the front is completed, rotate the skirt a bit, allowing the edges to be matched for color and decorate the back of the skirt.
- When the surface of the skirt is finished, a hanger with clips (or clothespins) can be attached.
 Remove the stencils and paint. (This is necessary if the shirt was badly stained. If not, then can leave the unpainted parts alone if desired..)

- Using one of the same stencils as for the skirt, cover the stains on the top shirt with the same type of decoration. The goal is to make it seem as though the shirt and skirt were meant for one another.
In this example, I glued on of the butterflies over the stains on the shirt and traced it with fabric paint directly from the container's pointy tip. A sharp pencil helps remove the foam shapes while the fabric paint outline is still wet. (Otherwise, it might stick, and besides, will make the project take too long.)


- The foam shapes can be washed and re-used.

- Hang the shirt and skirt until thoroughly dry (usually overnight).

- The pinning and sewing will be easier if you use soap as a pin-cushion, as the soap will ease the pins and needle through the fabric.
I also recommend a thimble for pushing the needle through the paint, and for those of us over forty, a needle-threader (sold 3/$1 usually) is a lifesaver.
Match the thread color to the top shirt.
- Turn both the skirt and the shirt inside-out. Fold over the skirt where it was cut (not at the bottom, where there is already a finished seam, but at the unfinished cut end) about one-half to three-quarters of an inch, using either a ruler (recommended) or whatever you have on hand (pen, scissors, soda can) to make sure both vertical sides of the skirt are the same measurement.

- Measure the width of the shirt at its hem. On the inside of the hem (which is facing out now, because we turned it inside-out earlier, right?) mark the middle with two dots.
Mark with one dot every inch in between the middle and the edge, working outward from the middle to each side. Do this on both the front and back of the shirt.
- Count the number of dots between the edge and the middle, not counting the edge or the middle. (In this example, I had four dots between the middle of the shirt and its edge, as it was 10" wide, with 5"=middle that got a double dot, so there were dots at 1", 2", 3" and 4" between the edge and the middle.)
- Measure the skirt. Measure the width of the skirt at its folded inside edge. Mark the middle of the skirt width with two dots.
- Divide the width of the skirt by the width of the shirt. This will tell you how far apart to make the same number of dots on the skirt. (In this example, 16 inch wides skirt / 10 inch wide shirt hem = 1.6 inches between dots on the skirt. That's about one and one-half inches. It's okay to use approximations and eyeballing too. It's a play dress made of
free stuff, after all. Just focus on making the area between the dots as even as possible. Don't obsess. - Working outward from the double-dots in the middle of the skirt, mark the the same number of dots on the skirt.
(In my example, both the shirt and the skirt had four dots between the middle and the edges.) Do this on both the front and back of the skirt. Make a line at the edges to mark them.
- Match up the dots and pin. Start with the middles/double dots on both the front and back of the shirt. Then match up the side seams of the top shirt with the marked line on the edges. Then get the single dots between the side seams and the middles.

- When it's all pinned, turn the dress right-side-out to check it before sewing.
Don't worry if it looks a bit clunky. When the pins are removed it will look better.
- Turn it back inside out, and sew the skirt to the inside of the hem of the shirt. (In my example, it was a 20" seam, around both sides of the 10" wide shirt.)
- Muwahahah! They're Alive!!!! Celebrate, because you're done. Just watch out for those torch-wielding peasants!


This is such an easy project that I plan to convince my older girls to make their own, disinterring the rest of the stuff in the Clothing Cemetery.)
(
Update: Here they are, on Gretta!


10 comments, so far. Add yours now!
Post a Comment
Don't forget the pics of the model. I'll be checking for the cutie!
Those are adorable. I need to have children now, so I can make some.
But what if they're boys? Must give this some thought.
Ayelet,
Thanks! You can never find a toddler when you need one...!
Balabusta in Blue Jeans,
Boys use up their clothes so thoroughly, that the fibers of their garments ascend to Heaven directly, with no need for a proper burial in the Clothing Cemetery.
Jonathan can just think about a pair of pants hanging in his closet, and the knees rip.
We get bags of used clothes from friends with many girls. A dress can go through three families of multiple girls, and only get downgraded from Shabbat Dress to School Dress to Play Dress status.
With boys, there is very little to share after the first one gets a shot at a pair of pants.
in step 7, is "to fix" supposed to be "too thick" ?
Anonymous,
YES! Thank you so much for letting me know. It's fixed now.
Apparently, I need to be a bit more careful editing dictated text before hitting "publish"!
How long does it take you to make one of these? I am very impressed at your resourcefulness (then again, I always am....)
What a brilliant idea! But you may want to correct the typo in step 3!!
Anonymous!
Thank you, and Yikes!!! I almost wrote a comment asking you to identify the typo, because I couldn't see it after about 7 re-readings!
Finally, I got it!!!
Thank you for pointing it out, and for doing it so subtly.
Oy!
Happy New Year!
hi!!!!! so nice anfd great a cute dress for a little girl out of her older sister rug shirt!!wow! awesome
HI,
i'D LIKE TO COMMENT THE DRESSES LOOK REALLY GREAT EVEN BEFORE YOU APPLY THE EXTRA BUTTERFLY PAINT.
PERSONALLY I PREFERRED THE SIMPLIFIED LOOK.
GREAT IDEA! AND SHABBAT SHALOM, EVERYONE!
Post a Comment