I often have cause to make a decorative closure for a large number of gift packages. This is the method I've developed for doing it quickly, using a minimum of curling ribbon and a minimum of frustration.
I like doing it this way because I can prepare the ribbons in advance, allowing the packages to be assembled at the last minute, or opened and closed again without untying tiny knots.
This is particularly useful for birthday party goodie bags, where the kids might make a project during the party. The project can be placed in the bag and the bag sealed in a decorative fashion at the end of the party.
I also like this for packaging lollipops. A piece of plastic wrap secured by some curled ribbon around the stick makes a nice presentation, but it is aggravating to tie the ribbons around the stick, because the stick is so light.
When we make chocolate lollipops, all the ribbons can be made while the chocolate cools.
I like to use curling ribbon because it is easy to work with, inexpensive, and portable.. It is easy to keep many colors in stock since a large roll costs about $2.
Instructions:
- Choose a few colors of curling ribbon to use. Keeping the ribbons on the rolls (i.e. do not cut) pull a few feet of ribbon loose. Working with all the stands together make a slip knot about a foot from the ends of curling ribbon.

- Take a twist-tie or bit of pipe cleaner and bend it in half.
Slip through the loop of the ribbon slipknot and twist the ends of the twist tie to secure it to the ribbon.
Pull the slip knot tight around the bend in the twisted twist-tie.
- Pull another two feet or so of the combined ribbon, and repeat the above steps with another twist-tie. Continue this way until all of the needed twist-ties are secured to the ribbon.

- Cut the ribbons between the twist-ties to separate. There will be about one foot of ribbon on either side of each twist-tie.

- Using one blade of a scissors, curl the ribbon by pulling the scissors (away from your body along the ribbon's surface.
If the ribbon is not curly enough the first time, run the sisters blade on the same side (i.e. top or bottom) of the curling ribbon again. If you run the blade first on the top and then on the bottom, the curling results will cancel each other. If you run them on the same side, the curliness will add/double.
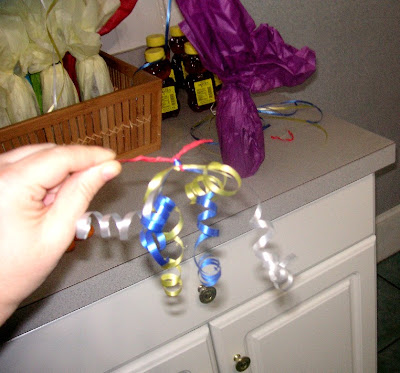
- Attach the completed ribbons to the gifts, when the gifts are ready.

For years, we gave the teachers at our children's school a honey dish at the beginning of the school year as token gift for the Jewish New Year (Rosh Hashanah).
Since it is traditional to eat apples dipped in honey for the new year, I was delighted to find these small apple-shaped dishes at our local fancy-china-store-outlet, about 10 years ago. I bought a few cases of them, and used them for many years. (There are a couple of teachers out there (perhaps reading this blog) who have four of these - a matching set - from teaching four of my kids!)
It wasn't until the outlet store went out of business that I realized that while I was looking at them as an apple dish for apples and honey, the teachers were probably very tired of receiving apple-themed gifts. (As in, "an apple for the teacher", which never occurred to me!)
It was around then that I switched to giving honey bears, which have the advantage of being consumable so they don't add clutter to the teacher's lives.
Had I not purchased our honey (in bulk cases from the restaurant supply store) earlier this summer, I'd strongly consider ordering some of these adorable Rosh Hashanah themed soaps, made by the even more adorable daughters of my friend, CruncyGranolaMom.
Here's wishing all the readers of this blog, a happy, healthy, peaceful, prosperous, and sweet new (academic and/or Jewish) year.
 (This post is part of the Works for Me Wednesday group writing project.)
Here are the rest of my contributions to the WFMW project.


