Monday, July 30, 2007

Rebuilding the Beit Medrash

Last summer, at my kids' request, I made a shul (synagogue) for their dolls. It was a hit, and it was enjoyed throughout the year.

After a year, however, it needs repair. The girls have been asking me to restore it to its former glory.

Since I have this blog, I plan to document the repairs and replacements as they are made.

Perhaps it will give you some ideas....


The doll shul was elaborate, with many accessories. I snapped a couple of pictures of the building process, but none of the finished product. A few months later, my sister visited, and insisted on taking a few pictures of 'our shul' when she saw the girls playing with it.

Today, a year later, the frame remains in good condition, but the ladies' section and most of the accessories need to be replaced.

The goal was to make a toy synagogue that would stand up to lots of playful abuse:

  • I used fancier materials than we normally use for one of our standard doll houses, in order to show honor for the synagogue in the abstract, and for the Torah and its accessories.

  • I gave up some of my real beads and fabrics, and spent more time on it than one of my 'normal' dollhouses.

  • I wanted there to be room for a at least whole minyan (10 men) of men, and a comparable number of seats for the ladies.

  • I wanted the Torah and its accouterments to be somewhat accurate for both educational and play value.

  • If an idea resulted in something too fragile or dangerous for play, the idea was discarded, no matter how cute/clever/fun it was.

  • I wanted the shul to be a toy that many children could play with at once. I wanted my four daughters and their visiting friends to be able to play simultaneously without having to fight for space.

  • I wanted the boxes to be storage-friendly and easily able to move from room to room mid-game.

  • This toy had to be sturdy enough to stand up to constant use, by children aged 2-10. (last year.) Thus, I reinforced the edges of the boxes with bits of wood (scavenged from our deck-in-progress' scrap pile) to make the cardboard toddler-resistant. (I think this was successfully achieved: Gretta spent some time inside the shul, and the box didn't cave!)


This is what the finished shul looked like. The men's section is on the left, covered in fabric that looks like brown stones. The main entrance, leading to the social hall on the right, covered in fabric that looks like grey stones. On top of the main entrance, there is the (removable) ladies' section, which is a balcony that overlooks the men's section, when the doorway-arches of the men's section and the front entrance are aligned. There's a pink staircase for the ladies to get to the balcony (far right).


(In the foreground, there are a few strollers made of Must Gum boxes or broken coat hangers.)

This is the view from the "East". The flower boxes were made from a lid to a plastic container, each box from one side of it. (See the doll house post for a similar pair of window boxes.) Inside the flowerboxes, a whole cinnamon stick was glued to the back, with whole cloves used as the stems of the paper flowers. I wanted the shul's flowers to smell nice.)

And this is the view facing "East."
(The yellow bead is the ner tamid /"Eternal Light" The purple is the reading table. The seven-branched menorah is made from pony beads.)

The Torah had the first sentence of each of the five books written on it.
It was about 15' (5m) when unrolled. The keter (crown) and cover were made from
duct tape and painted or covered with fabric and beads. The breastplate was a Popsicle stick, painted silver and adorned with beads and a chain.
The yad (pointer) was a bit of wire attached to a chain.
(See my "Toy Torah Tutorial " for step-by-step instructions on how to make a similar toy Torah. It has downloadable, printable files for making the scroll, saving signifcant time and effort.)


How the Toy Shul was made:
Making the Rooms:

I started with a pair of identical cardboard Amazon boxes. The basic structure involved two boxes and a tray. The first box, held vertically, with the opening on its side, formed the front entrance of the shul and the social hall.

Here are three views of the first box, after it had been cut to shape and the edges were reinforced with painter's masking tape: (No special reason for the blue tape. It was what we had lying around the house.)
Toy synagogue: box 1 view aToy synagogue: box 1 view bToy synagogue: box 1 view c

On top of the first box, the tray held the ladies' section. The ladies' section is a balcony overlooking the men's section. Since this was on a tray, it could be removed and played with separately.

The second box, held horizontally, with an opening on the top, formed the men's section.
It has four walls and no lid.

The big arch opening is the same size as the arch opening in the first box, so they can line up. It was important to measure this arch on the second box first, and then use it as a guide on the first box. Otherwise, the doorway/entrance to the men's section might have been too big for the box size!

Toy synagogue: box 1 view c

Inside the men's section, there was a built-in bima (stage/dais) and aron (special closet for holding the Torah scrolls.)

Making the Aron, the Amud and the Bimah:

The aron was made from some bits of the cardboard that had been removed from the first box.

This cardboard frame was held together with masking tape. A wooden barbecue skewer was trimmed to size to serve as the curtain rod for the parochet (special curtain that opens and closes on the aron.)

Later, the aron was covered with wooden coffee stirrers. It was painted brown.

A pony-bead was glued to either side of the skewer hole, to help guide the skewer/curtain rod and to keep its ends hidden.

Bits of coffee stirrer were painted to look like two tablets, and they decorated the top of the aron. A crystal bead was glued to the top of it to look like the "eternal light".

The amud (podium) was made by glue-gunning a bit of a coffee stirrer to a sanded piece of scrap wood.

The shulchan (table that holds the Torah when it is being read) was made the same way, but I don't have a close-up picture of it.)


The shape of the bima (platform/stage) was made from bits of egg carton and cardboard. The bima (platform/stage) was reinforced with duct tape and filled with Styrofoam 'clay' to make it sturdy.

Sections of paper towel tube were stuffed with with Styrofoam clay, and then the rest of the volume were filled snugly with more Styrofoam clay. It dried overnight and became solid and firm.


Initially, I made a cardboard tray for the ladies' section. Sometime later, I found a discarded wooden bread tray in our basement, and upgraded to that. It was the perfect size, and very durable. (Not durable enough to have lasted the Winter, though.)

The 'pews' of chairs were made from egg cartons. It turns out, that egg cartons are the PERFECT size to be chairs for 1:12 scale dolls (such as Fisher Price/Playskool Loving Family sized dolls. Fashion Polly dolls can plausibly sit in them, too. One egg forms the seat, a second is the chair base.

This is the top view, with the ladies' section balcony on the left hand side of the picture, and the men's section to the right. The amud is to the far right, at the bottom. There are 14 seats in the men's section and 18 seats in the ladies' section.
Here are some of the shul's beta testers.

Ultimately, the tray/ladies' section was the most popular section, and that is why it no longer exists!

The ladies section was carpeted with a fabric remnant and decorated with lace, Popsicle sticks, and bits from the egg cartons. (The blue diamonds are painted on the egg carton bits in this
photo:)

Here is a view from inside the social hall. The dolls are posed in "Groups" (the children's sessions that form during the main shul's Torah service and Rabbi's speech) led by a teenager doll:
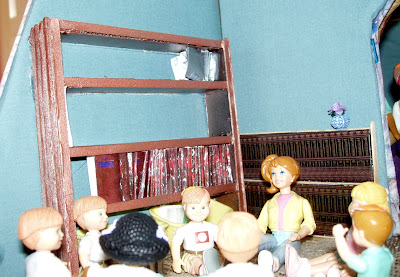
The large (left hand side of picture) bookcase was made from coffee stirrers and painted. It is "built-in" (i.e. glue-gunned to the walls). It is filled with mini-siddurim. We lost all of these, and I plan to replace them, with a tutorial on this blog, soon.

The shorter bookcase (on the right) has a set of non-removable Talmud, clipped from an Artscroll catalog and glued to a piece of foam-core. The "bookcase" was built around it, from coffee stirrers.

There is a bit of a cardboard whiteboard at the front entrance for announcements. That's my sister's handwriting!


The sign on the staircase says, "Stroller Parking". Just like our real shul, strollers must be left outside. My kids insisted on this!

In fact, they asked for many strollers. We made single strollers, double strollers with front and back seats, double strollers with side-to-side seats, umbrella strollers, carriages....

I made them from broken plastic hangers and Must Gum boxes, mostly. The girls have been asking for more of these, so I hope to have a tutorial in the coming weeks.


So, that is what it was. Over the next few weeks, I hope to re-make/repair the following, while making tutorials so you can, too: (in no particular order)

Friday, July 27, 2007

Shabbat Shalom!

Emily says Shabbat Shalom July 27 2007 (Here's a quick, easy, no-mess, no-fat desert that doesn't heat up the whole kitchen:

Chocolate Covered Strawberries
  1. Melt chocolate chips in glass bowl, in the microwave.
  2. Dip washed, dried strawberries, swirling to coat.
  3. Place the strawberries on a cookie sheet that is loosely covered with aluminum foil.
  4. Refrigerate for a minimum of 15 minutes. The foil will not stick to the hardened chocolate, and it will be very easy to remove the chocolate covered strawberries from the foil at serving time. )


Please note: this blog is not updated on Friday nights or Saturdays. Comments made during this time will be put in a queue, to be moderated after Shabbat.

Shabbat Shalom! שבת שלום

My husband is an idiom mangling machine

I love my husband's slightly intentional malapropisms. He is full of them:

  • "If it were any closer it would bite you". This is what he says when witnessing my frantic search for the eyeglasses that are hiding on top of my head. As a child, my husband mistakenly learned this, instead of the saying, "If it were a dog, it would have bitten you." For years, he insisted his version was correct!

    Thank goodness for the pointless-argument resolving properties of the Internet.


  • "That's like six of one and a dozen of the other." For years, I thought he was being sarcastic when he said this. He's a mathematician for crying out loud! A few years ago, when I thought its casual irreverence particularly inappropriate, I called him to task.

    He blinked at me, the picture of befuddled innocence. It then dawned on me that he had inaccurately encoded the idiom. (We'll be married 20 years next month; I should have known better. )

    I carefully explained that the real idiom is "six of one and half a dozen of the other."

    Looking at me with profound relief, he said, "That one never did make any sense to me."


  • My personal favorite: "We'll burn that bridge when we get to it." This one conflates "We'll cross that bridge when we get to it." with "Don't burn your bridges."

The mangled idiom is sometimes more insightful and nuanced than the aphorism it replaces. I often prefer my own garbled and misunderstood song lyrics to the original, correct versions, when I learn of my mistakes.

After all, "Perception is in the eye of the beholder."

Thanks for the wake up call... Embracing Insomnia


A neighbor's party woke me at 2:30 this morning.

We live in Studentville, USA, so it wasn't an unprecedented event. But July is usually a slow month for Thursday night (um, Friday morning) alcohol-inspired noise fests. I wasn't expecting it.

While I do have five kids, aged 3-15, they are mostly past the nightly-parent-waking stage (sharing dreams good and bad, asking for a glass of water, shrieking when a housefly invades a bedroom...)

And everyone has been healthy lately. We haven't hosted a moonlight tag-team vomiting competition in many months. Thank G-d.

So when the post-midnight festivities got out of hand last night, I was a bit out of practice. Luckily, the lessons learned from years of on-the-Mom-job training kicked in immediately. It was like falling off a bicycle; you never forget how to do it.

I know when a night's sleep is shot. And I know better than to fight a wounded sleep.

My strategy is to let a shot sleep die with dignity. Rather than attempting resuscitation, I fast-forward the grieving process, moving as quickly as possible to acceptance.

The trick is to eschew any hope of going back to sleep. Once I accept my involuntary awakened state, I embrace insomnia as an unexpected (and thankfully, rare) visit from a good friend. I can do this, because I remember:

Nothing is as efficient as a mother with a found hour.
I defy any veteran Air Traffic Controller or seasoned White House Events Coordinator to match the productivity of a mother with a cancelled medical appointment. With the focus of a laser beam, she will carve more errands and phone calls from that hour than they could list on their color-coded Gantt charts.

And if the impromptu hour of slack falls on a Friday morning, watch in awe as she choreographs a complex ballet of accomplishment: A chorus of appliances - laundry machines, oven timers, bread machines, standing mixers, and laser printers - humming in harmony, with the challah dough rising in the foreground. All while she's on hold with the insurance company, changing a diaper, closing the refrigerator with her foot.

Professionals make it look so easy.

In the middle of the night, however, the devices enlisted must be quiet, in order to let the rest of the family sleep. Yet there are still plenty of opportunities to be my own elf - to do vital favors for the sleepy person I'll be in the morning.

In the wee hours this morning I showered and got dressed, tidied and inventoried personal care supplies, discovered that we're down to the second-to-last container of my favorite toothpaste, caught up on 15% of overburdened Google feed reader, filed 3" of benign paperwork backlog, and started this blog post.

I spent about two hours writing and rewriting lists in my little notebook, and generally 'emptied my head.' It was cathartic and refreshing. I reveled in being able to finish a sentence in my own mind.

As I ordered my favorite toothpaste on-line, a wave of gratitude engulfed me. I realized that I have been my car only once in the past three weeks. I love the Internet.

During the school year, I often quip that I need to buy that bumper sticker that says:
If I'm such a stay-at-home Mom, why am I always in the car?

Sandwiched between the academic year-end frenzy of June and the September's dramatic double onslaught of the Jewish holidays and the return to school, summer is our oasis.

During the school year, our calendar is stuffed overfull with obligations and commitments. In the Summer, we luxuriate in extending or cancelling activities, subject to the whims of the weather and our moods. In Winter, we march to time's drumbeat. In Summer, time is our languid dance partner.

My answering machine has zero saved messages. I love summer vacation.

Summer does come with open windows, however. Through those open windows came the party noises that woke me last night. It's a package deal.

So, thank you, dear youthful neighbors, for giving me a few moments to meditate on the good fortune that allows my family to enjoy our unstructured summer schedule. Thank you for your gift of an unscheduled pause to appreciate of the blessings of the Internet. Thank you for the few hours of sleepy solitude.

I hope you found this morning's construction workers' 7:15 a.m. jack-hammering just as inspiring as your nocturnal celebrations were for me. Perhaps it gave you time to introspect on the deeper significance of a hangover. Maybe you found this an opportune time to sweep the street of the glass from the bottles that broke as your guests departed at 4 a.m.

I smile when thinking of the City of Boston's gift to both of us: the opportunity for you to share this moring's spectacular sunrise with me.

Have a great morning.

Wednesday, July 25, 2007

Foam-core Doll house


This is our fourth year 'uncamping', and we love it! Now that Tisha B'Av is over, we can concentrate on crafts.

We have made this type of doll house many times. Usually, the kids play with the bare white frames (some of them have been in daily use for years), but today we made one and decided to decorate it:

The goal is a cheap and easy, durable doll house frame for the kids to decorate.

I like to make these dollhouses very shallow (5"), to take up minimum floor space in the kids' rooms. This size house would be suitable for any standard 1:12 (1"= 1') scale doll. (i.e. 10" storeys would be 10' ceilings.) The Fisher Price/Playskool "Loving Family" dolls are in this scale. Fashion Pollys are smaller, but this size house works well with that size too, as long as the children don't care about scale.
This is a play doll house (as opposed to 'heirloom' style), with no pretensions of outlasting a couple of active seasons of active play.

Making the frame took us just under an hour. (It took this long because I paused often to snap photographs, and because the phone was ringing off the hook, causing multiple interruptions.)

Decorating the house takes as long as you'd like. It can take zero time (just let the kids use the bare white frame) or days (for something elaborate and well-executed.) Sometimes, we've let the kids go wild with magic markers and crayons, and let them decorate it however they like.

Today, Emily wanted me to help her decorate it 'according to her vision.' So we worked on a kid-style, kid-designed, medium-quality, medium-effort design that took abut half a day to complete.


We started with three 20"x 30"foam core boards.


Measure and mark the boards in the following manner:


Board A: Face of building: mark vertically in 10" wide increments. These will be the guidelines for placing the walls. This board will be used whole.


Board B: Floors: Mark the board in 5" wide horizontal lines for cutting the roof, and floors of the dollhouse.


Board C: Walls: Mark the board in 5" wide vertical lines for cutting the interior and exterior walls of the doll house.


On Board A, make a horizontal line at 10" as a guideline for the middle floor. Mark where the windows and front door will go.


For small round windows, trace the interior diameter of the packing tape. For large round windows, use the exterior of the packing tape as a guide.


Cut out the windows using a craft knife or scissors.


Cut through one side and the top of the door. Score the other side of the door, on one side of the foam core, leaving the other side of that side of the door intact.


Do not fret if you cut through the whole door by mistake. It can be reattached, using duct tape or medical tape as a hinge.


Save all the cut-out parts of foam-core throughout this project to make doll house furniture.


Test the door, and the sizes and heights of the windows before continuing. The window openings should be large enough for little hands to reach through them, without getting stuck.


Cut Board B and Board C on the lines drawn earlier. The long boards will be the floors, and the short boards will become the walls.


Three floors and two walls will be used as is.


The remaining pieces can be cut to fit, to become the interior walls.


Life will be simpler if you add the walls and floor in the following order:


FIRST attach the middle floor, with clear packing tape, using the horizontal guide-line on Board A.


SECOND, add the exterior walls and secure with packing tape.


The exterior walls should be added to the OUTSIDE of Board A. The width of middle floor will make this necessary and obvious, as it is the complete width (30") of the Board A. This is why I recommend following this order of adding walls and floors. It saves you from having to calculate/account for the width of the pieces. It prevents the walls and floors from being misaligned, without too much thinking.)


THIRD, add the roof and bottom floor with clear packing tape. These will go on the outside of Board A.


FOURTH, once the top and bottom are attached to Board A, use more clear packing tape to attach the top and bottom floor snugly to the outside walls.


Make interior walls, using a full wall-length width from Board C. To account for the space taken up by the middle floor, slice out 1/2" (roughly) from the middle of the piece.


(It starts out as a 5"x20" piece of foam core sliced from Board C. At the middle of the length, cut two 5"x 9.75" pieces, by taking a half inch from the middle.)


Generously tape everything, inside and out. The more tape, the stronger the frame. Test how it stands. Try to put pressure on the roof, etc. Your kids will surely test it once it is done!


Congratulations! The frame is done!


At this point, the kids might just walk off with it, allowing the adult to go on her merry way. Or they might want to decorate it by themselves.


What follows are some directions that Emily wanted for today's house, most of which require some adult help:


To make a doorknob, a parent can help by poking a small hole in the front door with a craft knife. We have used brads and beads in the past. Kids have made their own holes with sharp pencils, too.


It is best if an adult does this part, however, because it is easy to break the door.


Attach a handle to the roof. Emily wanted to be able to hang this doll house from a hook near the top bunk of her bunk-bed. She also wanted to be able to carry the house easily from room to room.


This is one of 5 "shelves" made of wire that were part of a broken towel rack. Clothes hangers, (or snipped wires from them) can be used to make a handle. Alternatively, you can make two small holes in the middle of the roof, each about 1/3 from the outside walls, and knot rope or heavy-duty ribbon to make a handle.


If you're adding a handle, this is a good time to perform a hang test.

Here's Emily, testing the handle.


A quick doorknob is made from a pipe cleaner (They are now more commonly called "chenille stems"; I guess I'm dating myself calling them 'pipe cleaners' instead.) and two pony beads. Thread the tip of the pipe cleaner through the bead and twist to secure it.

Thread the pipe cleaner through the door knob hole.

Thread the free end of the pipe cleaner through the other bead, and then feed it back through the door knob hole. (You will be back on the same side as the firs bead. Pull tight to secure.

Wrap the pipe cleaner once around the outside of the first bead, then thread the pipe cleaner back through the bead. Trim the excess pipe cleaner.


Emily wanted to make a stained-glass window. We took the foam-core piece that was cut from the window and taped it to the bottom of transparent plastic container lid, using packing tape. Emily worked from on the top of the lid, using the foam-core (that was taped under the lid) as a guide.


This prevents her from making something too big for the window. (Been there; done that; had to console the kid.)


She cut shapes from colored tissue paper and arranged them on the plastic lid. She used various hole-punches to make the shapes.


Hole punching tips:


  • To prevent tissue paper from getting stuck in the hole puncher, place the tissue paper on top of a piece of regular-weight paper.

  • To sharpen the hole puncher, punch aluminum foil.

  • To "grease" it, punch waxed paper.


When the final arrangement is complete, use clear packing tape to cover the design and an additional 1/2" perimeter completely. Peel the tape from the plastic lid, and cover the back with packing tape as well. Trim the edges to 1/2" larger than the window opening.


We had a piece of fabric that looked like planks of wood. We used it to cover the outside of the house. (This would be a great job for a torn or stained sheet or pillowcase, too.)


This was Emily's completed stained window design.


"It's a fire breathing dragon at night with stars."


After securing the edges of the fabric to the outside of the house with a glue gun, I cut out the fabric that covered the window openings.


For the circular windows, start at the center of the opening, and cut multiple wedges toward the perimeter of the circle, erring on a too-small cut, rather than going past the perimeter of the window opening.


Pull the fabric (it will stretch) through the opening, securing the wedges to the interior of the house with a hot glue gun.

This is what the interior of the house looked like, once the fabric was attached to the outside and the window holes were completed.

We covered the door with a piece of a brown paper shopping bag.

To make a shingled roof, we chopped many, many, many shapes from a brown paper shopping bag. We used a diamond-shaped hole punch. This can be done with any shape.

Emily had a lot of patience. She kept at the shingle-punching for over half an hour.


She used two brown paper shopping bags to make enough shingles to cover the roof (and cover the door) of the doll house. I attached them with the hot glue gun.

For the carpets and floors, we sacrificed a couple of bleach-stained washcloths and a ribbon remnant.


Removable 'curtain rods' were made by attaching two pony beads to the edges of the window frames, using the hot glue gun. A pipe cleaner serves as the curtain rod.


Last year, after our school's annual 'gift wrap fundraiser', I salvaged from the school recycling bins a bunch of the gift wrap samples from the catalogs. We have been using these for crafts for many months! (The teachers weren't interested; I offered them to the classrooms first.)


Emily chose her favorite gift wrap patterns, and then we used the gift wrap scraps patchwork-style as wallpaper. We also used some pink tissue paper, folded over a couple of times, on the side walls in the top floor middle room, and some craft paper on the first floor.


Note the "stained glass window" (installed before the wallpaper, so that the wall paper covers and defines the edges) in the upper right hand room.


To make matched flower boxes, chop 1.5" deep edges from a foil pan. Paint and decorate before attaching to the outside of the windows with the hot glue gun.

My kids like their dolls to be Orthodox Jews. We have been using file label dots as kippot (yarmulkes) for many years. If we have white dots, they like to draw on them, pretending to "knit" the boys' kippot.


Here's the completed front, with the flower boxes.


Here's the completed interior, with curtains. (These were made by 'hemming' fabric scraps with a glue gun.)


Et voila!

All of our doll houses have mezuzot. This one is a painted toothpick (with a tiny "shin" drawn with a fine line Sharpie marker.)


I couldn't get them to stop playing and look up at the camera. They had waited all day to play with it, I didn't insist!

Final hang-test.

If you liked this article, congratulations! You have great taste. Please brew yourself a cup of coffee.
subscribe to Juggling Frogs