Easy Sukkot Project: Free printable sentences for banners to print and color

This is my favorite sukkah decorating project to make with a group of kids that span a large age range.
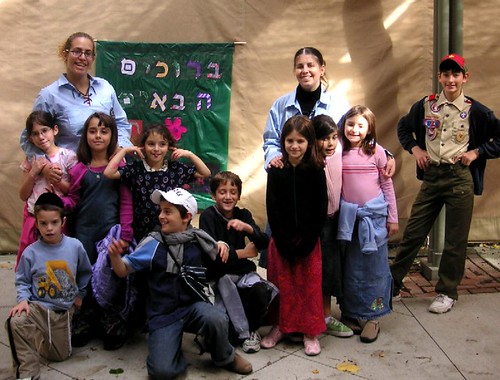
I've done this every year for many years with large groups of kids from the community, to decorate our synagogue's HUGE sukkah, with Boy Scout troops, and Bnei Akiva. We've also used this with our family sukkah at home.
The beauty is that it's a cheap, easy, and age-independent project. Since everyone gets their own page to color, minimal cooperation skills are required. I like how everyone works together on one big project, but each can take his own page to a corner of the room, without having to stake out space on a group coloring project.

In addition to the free downloadable sentence files below, you'll need a plastic disposable tablecloth in a bright color (not white), scissors, markers or crayons, and packing tape. One or two sticks or dowels, a bit wider than the tablecloth, is helpful but optional. We sometimes scavenge branches for this, for a rustic and natural (read:free) look.
(The sentence files are quite large. Right click and select "save target as..." to download them.)
- Sentence 1 ~ Index 1 הרחמן הוא יקים לנו את סכת דוד הנפלת
- Sentence 2 ~ Index 2 הזרעים בדימעה ברינה יקצרו
- Sentence 3 ~ Index 3ופרוש עלינו סכת שלומך
- Sentence 4 ~ Index 4 ברוכים הבאים
- Sentence 5 ~ Index 5 זמן שמחתינו מקרא קדש זכר לציאת מצרים
I like to use the tablecloths-on-a-roll. They're cheap (under $20 for a near-lifetime supply), and don't need to be folded. We use them for so many other projects, too: costumes at Purim, covering the counters at Pesach, and sometimes we even cover a table with them!
For each sentence, print both the coloring pages and the index page. It's amazing how easy it is to misspell even simplest words, when the letters are all jumbled up and in the hands of an escaping marker-wielding toddler!
Allow the children to color in the letters in whatever way they like. When the letters are complete, cut (or have a few older kids who can be trusted with the scissors do the cutting) along outlines. This will guarantee that even the scribbles of a two year old will be readable as letters, and will show up from across the sukkah.
Use the clear packing tape to completely cover the cut-out letters, effectively laminating them as they are affixed to the disposable plastic tablecloth.
Optional: Leave enough room on the tablecloth to make a bit of a hem on both the top and bottom of the banner, and slip the optional sticks or dowels through this hem to keep the banner straight in the wind.
Depending on the what your sukkah is made of, affix the banner using rope, safety pins, tape, bungee balls, etc.
===================================
For more Sukkot projects, click here.
===================================


3 comments, so far. Add yours now!
Post a Comment
This, may I say, is perfect. I've got a second grader who desperately wants to "help" - she can pretty much do this herself! Thanks!
What a great looking project!
Wow this is a great resource.. I’m enjoying it.. good article
Post a Comment